
Silver Shell Necklace With A Secret Pearl - A Silver Clay + Silversmithing Jewellery Project
If you love coastal design and you’re ready to refine your silversmithing skills, this intermediate project will show you how to turn a real bivalve shell into a solid silver locket with a secret freshwater pearl hidden inside.
You’ll make silicone moulds from your shell, use silver clay to create two perfectly fitted halves, then fire your pieces with either a blowtorch or a kiln. From there, you’ll engineer a working knuckle hinge and a magnetic clasp using sterling silver tube, before soldering, assembling, and finishing your locket so it closes securely and opens to reveal the secret pearl inside.
What You’ll Learn in this Silver Clay & Silversmithing Course:
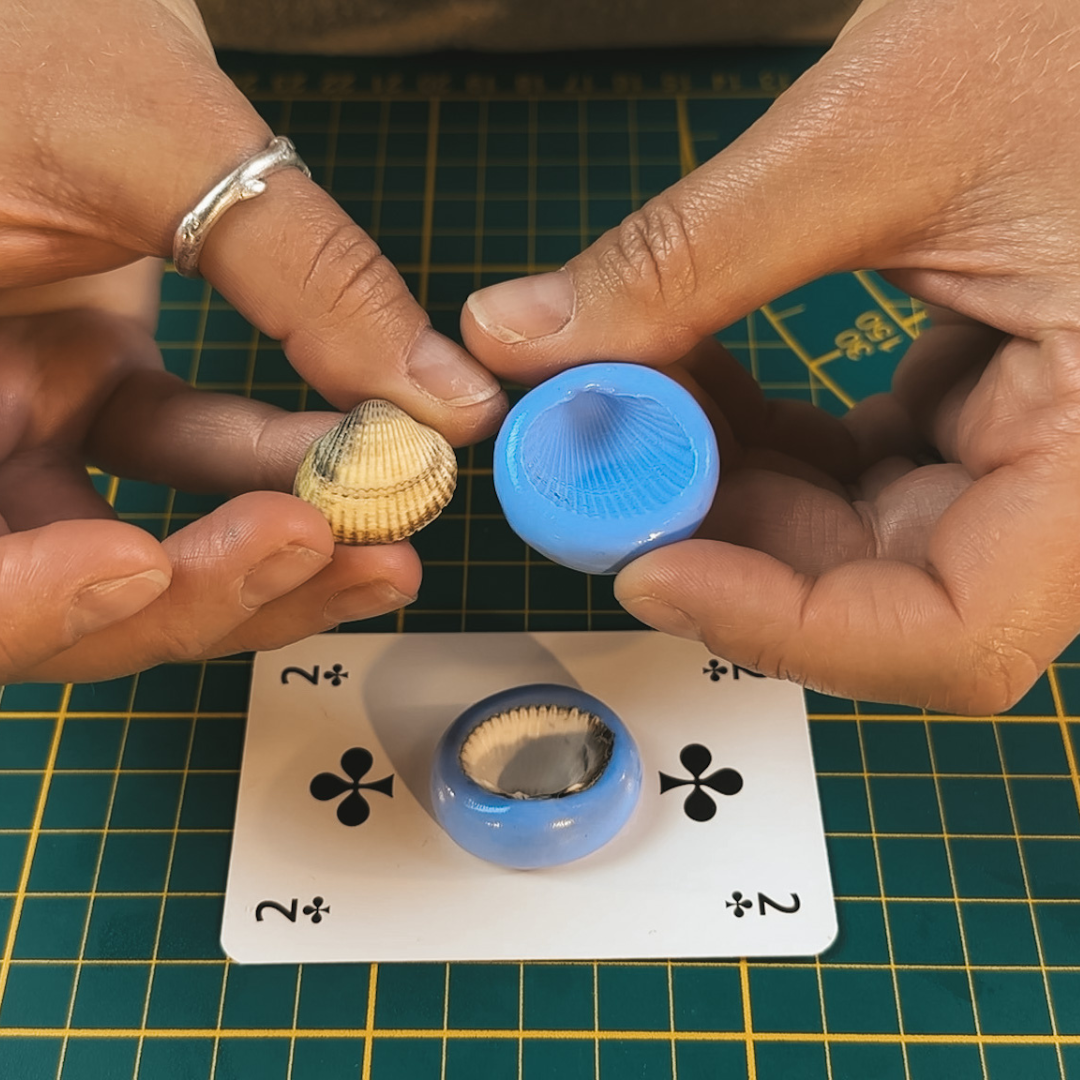
Make silicone moulds using a real bivalve shell

Use those moulds with silver clay to create perfect replicas

Fire your silver clay either with a blowtorch or a kiln

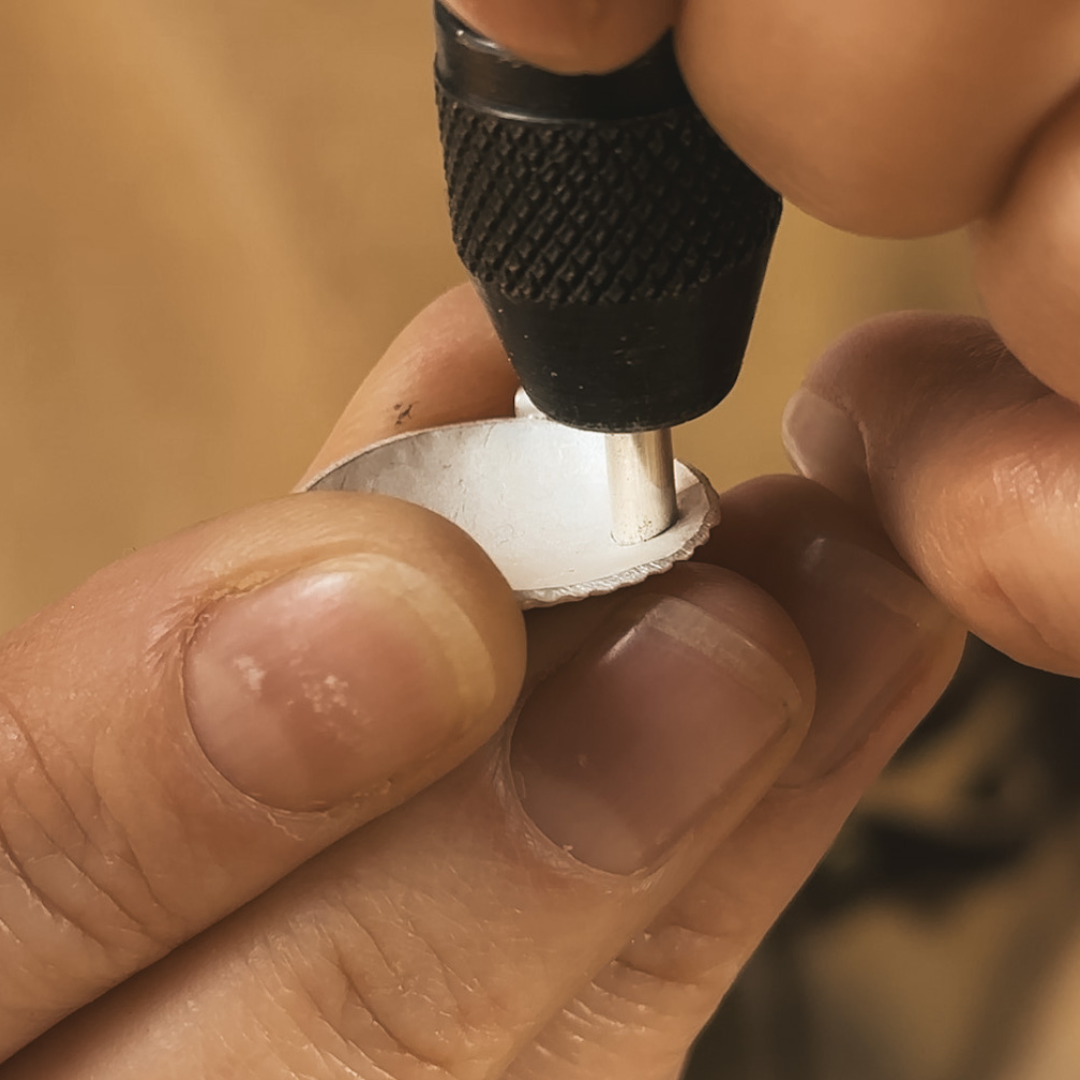
Learn how to prepare the shells for a hinge

Learn how to make and solder sterling silver tube to your shells

to create a working knuckle hinge
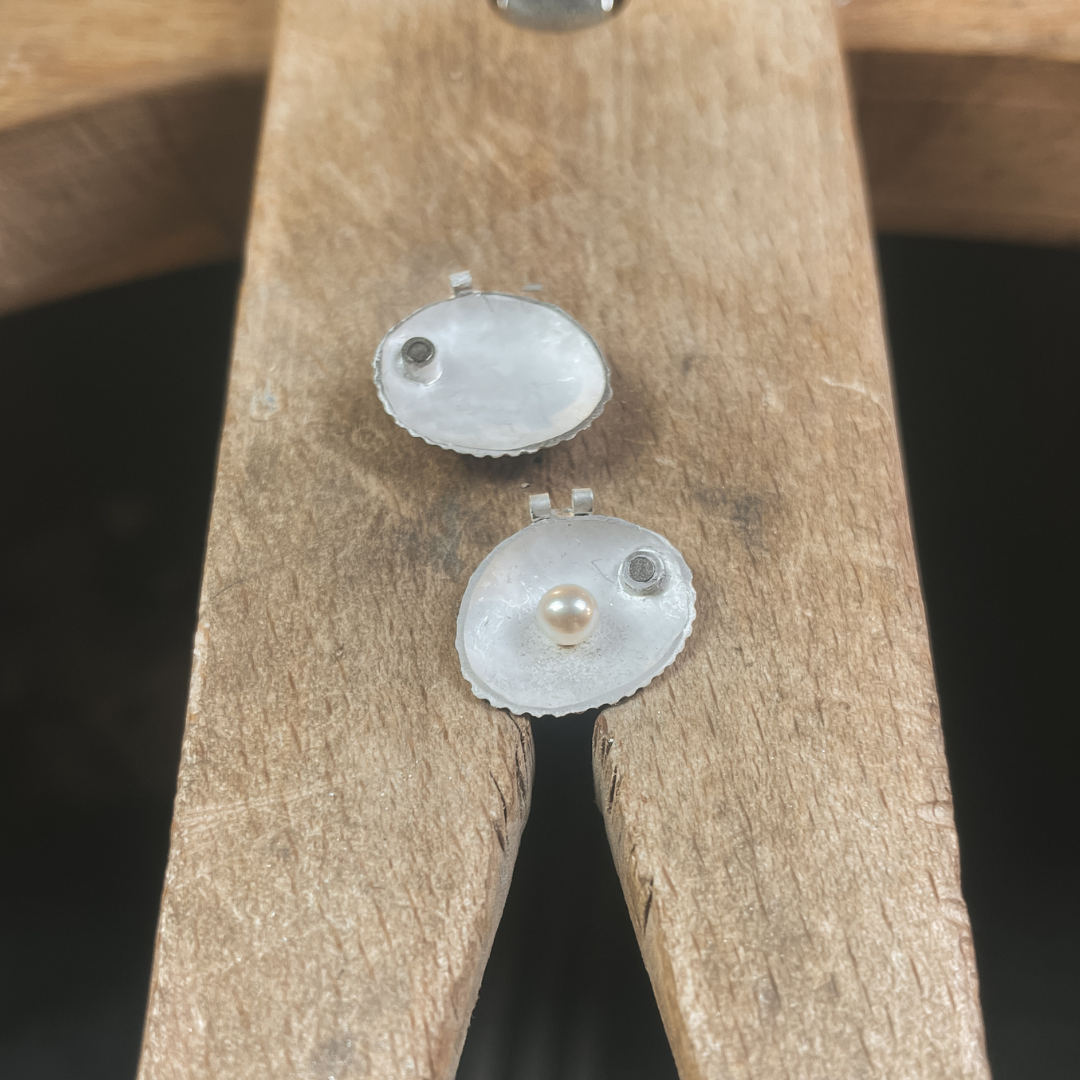
Create a magnetic clasp for your locket

Solder a post for the secret pearl
Learn how to assemble all of your elements

Create and solder the hinge wire

Attach the final jump rings
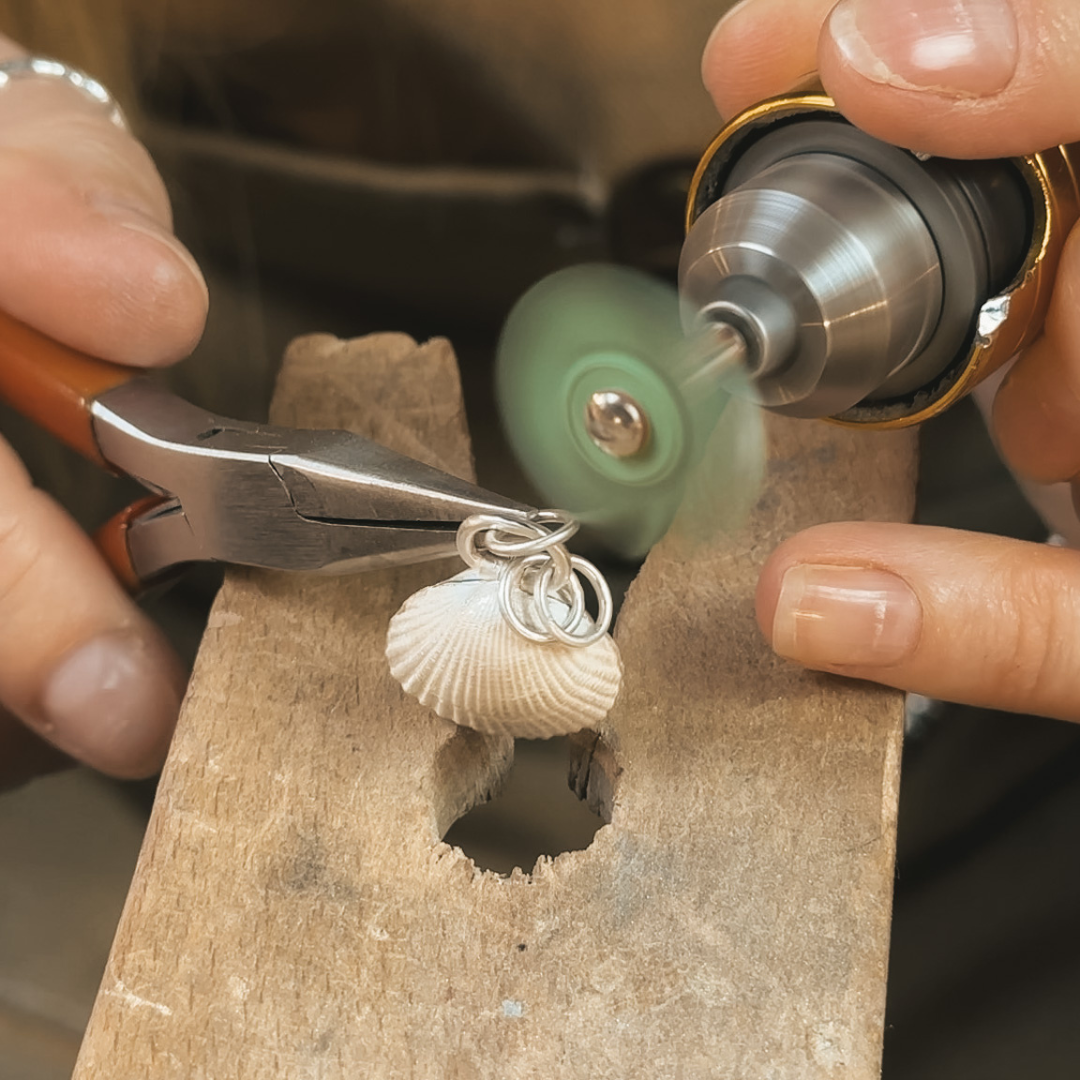
Learn finishing and polishing techniques (pendant motor and barrel polisher)

Attach your pearl and magnets

and voilà! A working solid silver shell locket with a freshwater pearl hidden inside
Ready to make this Project?
This project is part of our online membership, giving you unlimited access to all projects and tutorials. Learn at your own pace, with new projects added every month and ongoing support from award-winning jeweller Jessica.
Unlimited access to all projects, 30 day money-back guarantee, cancel any time
Have questions? check out the membership FAQs
Who Is This Intermediate Tutorial For?
✓ Jewellers who want to elevate their work with hinge making and a fully functioning locket
✓ Ocean lovers who want to preserve a real bivalve shell in solid silver as a keepsake, with a secret pearl hidden inside
✓ Makers who want to refine their soldering skills through more complex projects.
What’s included in this Project?
✓ 18 Easy-to-digest video lessons
✓ Bonus technical tutorials
✓ PDF written instructions
✓ A full tools and materials list with supplier links
✓ 1-2-1 support from Jessica if you need it
Tools and Materials needed for this project:
Browse our complete UK Master tools list, USA Master tools list, or Europe Master tools list with direct supplier links
Materials List
A double-sided bivalve shell (cockle, clam, scallop etc.). The shells I use for this project measure around 25mm in size.
Silicone moulding compound
10g Art Clay Silver
Sterling silver tube (for hinge) 5 -10mm long, external diameter approx. 1.8mm - 2mm, internal diameter approx. 1.2mm)
Sterling silver round wire (for hinge) 25mm - 35mm long, diameter 1.2mm or the same diameter as the internal diameter of the hinge tube)
Silver Solder (hard, with medium and easy/soft options)
Sterling silver tube (for magnet clasp) Approx. 10mm long, external diameter approx. 3mm, internal diameter 2.1mm)
Magnets x2 (for magnet clasp) diameter 2mm, depth 1-2mm
A half-drilled freshwater pearl. The size will depend on the depth of your shells. I use a 5mm round pearl but for shallow shells a half-drilled button may work better.
Sterling silver round wire (for the pearl) Approx 10mm long, 0.6mm - 0.8mm (22 - 20 gauge) or the right dimension to fit inside your half-drilled pearl
3 x 7mm sterling silver jump rings
A sterling silver chain
General Tools List
A cutting mat
Playing cards or silver clay spacers
Acrylic block/sheet
Olive oil and a paint brush
Plasticine or similar reusable modelling clay
A set of doming punches or rounded clay tools
A craft knife
Blu-tack
A vernier gauge
A pin vice
A chenier cutter
A permanent marker
A 1mm pencil lead or graphite rod (100% graphite)
A 6b graphite pencil (or other soft pencil)
A scribe
A jeweller’s saw and saw blades
Snips/side cutters
A pair of round-nosed pliers
Flat-nosed pliers x2
An ultrasonic cleaner or hot, soapy water and kitchen roll
A piece of card and and broken saw blade
A steel block
Choose between Torch and Kiln Firing
Tools for torch firing
Blowtorch
Firebrick
A timer (the one on your smartphone is perfect)
Tools for kiln firing
A kiln
A steel mesh
A firing fork
Soldering Tools List
A fire brick/soldering board
A blowtorch
A turntable
A pair of brass tweezers
A pair of steel tweezers
Cotter pins x2
A soldering probe
Pickling unit and pickle
Copper tweezers/tongs
Flux and a paintbrush
Fresh water
Straight and curved reverse-action tweezers (option to use soldering clay like Wolf Clay instead of the straight reverse-action tweezers)
Hand Finishing and Polishing Tools
Needle files (flat and round)
Sandpaper or emery paper (medium and fine grits)
A fine sanding sponge
Pendant Motor
A pendant motor
A diamond burr the same width as your hinge tube (optional)
A 1.2mm cup burr
A set of radial wheels
A soft polishing wheel & rouge polishing compound
Barrel Polishing
A barrel polisher
Stainless steel shot
Barrel polishing compound/solution
Frequently Asked Questions
Do I need a kiln or can I torch-fire?
Both options work. The project covers torch firing and kiln firing, so you can choose the method that suits your setup.
What type of silver clay should I use?
I demonstrate with Art Clay Silver, but you can use any brand of fine silver clay or other metal clay. Just follow the manufacturer’s firing instructions for your clay.
Do I need soldering experience?
This is an intermediate project so soldering experience is recommended. You’ll be soldering sterling silver tube for the hinge and the magnetic clasp, as well as soldering jump rings, so this is best suited to confident makers. If you’d like to make coastal jewellery but you’re not quite ready for hinge-making please check out the beginner-friendly Silver Clay Shell Earrings and Silver Clay Urchin Shell Necklace, or for more advanced makers, the Keum Boo Shell Necklace Project and the Urchin and Gemstone Necklace. All these projects are included in Membership
What shells work best for this project?
Choose a double-sided bivalve shell such as a cockle, clam, or scallop. The shells I use measure around 25 mm, but you can adapt the project to suit your shell.
What size pearl should I use?
The pearl size depends on the depth of your shells. I use a 5 mm half-drilled freshwater pearl, but for shallower shells a half-drilled button pearl may work better.
What size magnets do I need?
You’ll need two small magnets that fit inside your magnet clasp tube. I use 2mm diameter magnets, with a depth of around 1 to 2 mm.
What language is this online course available in?
The video tutorials are narrated in English, with subtitles and transcripts available in English, French, German, and Spanish. All printable materials, including PDF instructions and templates are provided in English.
Is this available as a standalone course?
No. All projects and tutorials are available exclusively inside the Cognac Jewellery School Membership.
Ready to make this Project?
This project is part of our online membership, giving you unlimited access to all projects and tutorials. Learn at your own pace, with new projects added every month and ongoing support from award-winning jeweller Jessica.
Unlimited access to all projects, 30 day money-back guarantee, cancel any time
Have questions? check out the membership FAQs